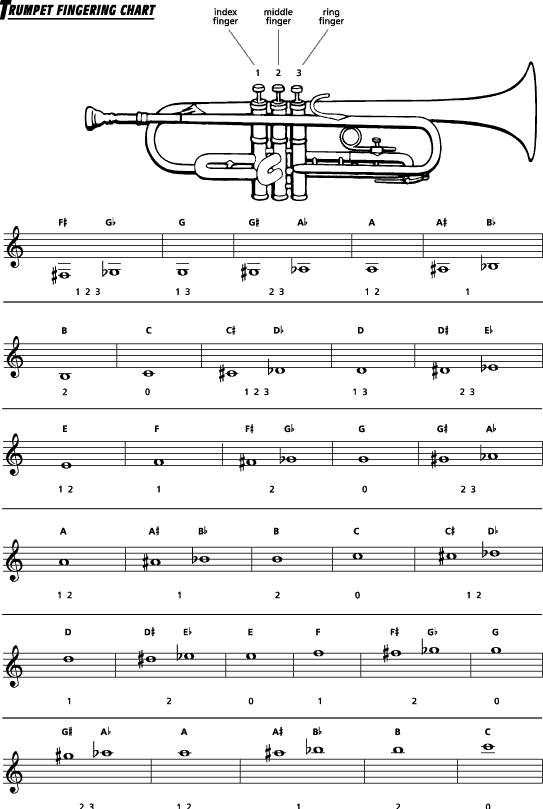
Trumpet Fingering Chart
Complete trumpet fingering chart with all valve combinations and alternate fingerings.
How To Use A Fingering Chart
It can be helpful to have a fingering chart when you are beginning a new instrument. The trumpet is like most brass instruments in that you use valves to change pitch. I've always found it helpful to start learning fingerings through scales. This helps you get comfortable with fingerings in a given key.
Once you have the basics, move on to real music and try to play through a passage. When you encounter a note you don't know, look at your fingering chart. Take a pencil and write the fingering under the note. Practice the passage slowly so your fingers can get a feel for the movement.
Once you feel comfortable (usually after three times through the passage), erase the written fingering. Play through the passage a few more times slowly and see if you remember the fingering. If you forget, write the fingering back in and repeat the process.
How To Hold The Trumpet
Left-Hand Placement
Start with the ring finger of your left hand and place it inside the slide ring of the third valve. Then take your middle and index finger and wrap them around the third valve casing. These two fingers will support the trumpet’s weight.
Next, place your thumb in the ring of the first-valve slide. Your pinky should be relaxed and rest on the valve casing under the third valve slide.
Your left hand should be firm enough to support the instrument, but avoid tension. Try to stay as relaxed as possible and keep tension from creeping up your arm.
Right-Hand Placement
Form a backward letter “C” with your right hand. Place:
- Index finger on the first valve
- Middle finger on the second valve
- Ring finger on the third valve
Try to keep your fingerprints centered on the valve tops. This helps keep the hand relaxed. The pinky finger should rest in the pinky hood, and the thumb should wrap around the first valve casing.
A note on the pinky: Avoid using it to create pressure against your lips.
Using The Thumb And Third Finger Slides
The first and third valves on the trumpet have slides with rings attached. These allow you to adjust pitch for certain fingering combinations, especially 1 & 3.
If you don’t “kick out” the slide when needed, the note will be sharp. A sharp note is just as noticeable as a wrong note, so slide adjustments should be considered part of the fingering.
To practice this:
- Play through a passage.
- Stop and hold a note that requires a slide adjustment.
- Check a tuner and adjust the slide until the note is in tune.
- Take a mental note of the slide position.
- Repeat the passage, snapping quickly to the correct slide position.
- Freeze on the note and check your tuning again.
Repeat until you can adjust the slide accurately right away. Keeping the slides well-greased will make this much easier.
Trumpet Fingering Table
| Note | Primary Fingering | Alternate Fingering |
|---|---|---|
F#3/Gb3 | 123 | — |
G3 | 13 | — |
G#3/Ab3 | 23 | — |
A3 | 12 | — |
A#3/Bb3 | 1 | — |
B3 | 2 | — |
C4 | 0 (open) | — |
C#4/Db4 | 123 | — |
D4 | 13 | — |
D#4/Eb4 | 23 | — |
E4 | 12 | — |
F4 | 1 | — |
F#4/Gb4 | 2 | — |
G4 | 0 (open) | — |
G#4/Ab4 | 23 | — |
A4 | 12 | — |
A#4/Bb4 | 1 | — |
B4 | 2 | — |
C5 | 0 (open) | — |
C#5/Db5 | 12 | 123 |
D5 | 1 | 13 |
D#5/Eb5 | 2 | 23 |
E5 | 0 (open) | 12 |
F5 | 1 | — |
F#5/Gb5 | 2 | — |
G5 | 0 (open) | — |
G#5/Ab5 | 23 | — |
A5 | 12 | — |
A#5/Bb5 | 1 | — |
B5 | 2 | — |
C6 | 0 (open) | — |
